Have you ever felt frustrated when a well-planned meal goes wrong? It might be because your oven is not set right. Using an oven thermometer can help you know the true oven temperature. Learning how to calibrate an oven temperature is vital for your cooking success. This guide will help you understand oven calibration clearly and will walk you through the steps.
Why Calibrating Your Oven is Essential
Achieving the right temperature is very important for baking and roasting. An oven that is not set correctly can show wrong readings. This makes it hard to reach the exact temperatures needed. This can lead to dishes that are cooked unevenly, burnt on the outside, and meals that are not satisfying.
Oven calibration is key for getting consistent results every time you cook. By adjusting your oven’s temperature settings, you can have better control over cooking. This removes the guesswork that comes with an oven that is not predictable.
When your oven is properly calibrated, you can follow recipes with confidence. You will know your dishes will cook the way you want. This boost in confidence helps not just with taste but also gives you peace of mind. You will know your oven is a useful tool in your cooking.
Common Signs Your Oven Needs Calibration
How can you know if your oven needs calibration? There are some signs that show it’s time to check its accuracy with an oven thermometer. If your food keeps coming out too cooked or not cooked enough, even when you follow the cooking times, it likely means your oven’s temperature gauge is incorrect.
Another sign is uneven baking. If you see that cookies on one side of the baking sheet brown faster than those on the other side, it means the heat in your oven is not spread evenly. This often happens when the oven isn’t calibrated properly.
Inconsistent results also suggest a need for calibration. If you use the same temperature setting but get different results each time – sometimes good, sometimes not – it is a clear sign your oven needs calibration for better performance.
Preparing for Oven Calibration
Before you start calibrating your oven, it’s important to collect the right tools and follow some safety steps. Being ready will help you make the process easier and calibrate your oven with confidence. Keep in mind that oven calibration deals with heat, so focusing on safety will help you have a smooth and safe experience.
What You’ll Need to Get Started
To calibrate your oven, you will need some important tools:
- Oven Thermometer: This tool helps you measure the temperature inside your oven accurately. Make sure to get an oven-safe thermometer that can handle high heat.
- Phillips Head Screwdriver: If your oven has analog controls, you will use a Phillips head screwdriver. It is needed to turn the calibration screw that you can usually find on the back of the temperature knob.
- Owner’s Manual: Check your oven’s owner’s manual for clear instructions on how to access the calibration mode. Different models may have different steps.
Having these tools ready will make the calibration process faster.
Safety Tips Before You Begin
Working with ovens means dealing with heat, so it’s important to be safe during calibration.
- Avoid Touching Hot Surfaces: The inside of the oven, the door, and the racks will be very hot while you calibrate. Always wear oven mitts to stop burns.
- Keep a Safe Distance: When you open the oven door to check the thermometer or make changes, stand back. This will help you avoid any sudden heat blasts.
- Supervise Children and Pets: Keep kids and pets out of the kitchen while you calibrate your oven. This will help prevent accidents.
By following these safety tips, you can have a safe and successful calibration experience.
Step-by-Step Guide to Calibrating Your Oven
Now that you have the right tools and safety steps ready, let’s go through how to calibrate your oven step by step. Make sure to check your owner’s manual for any unique instructions or changes for your specific model.
Step 1: Test the Current Accuracy of Your Oven
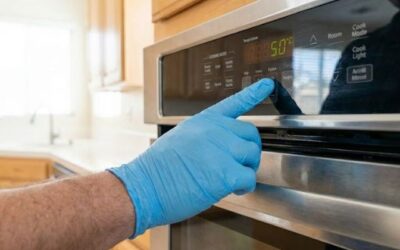
Start by checking if your oven’s temperature setting is correct. Put an oven rack in the middle and hang your oven thermometer from the rack or place it on the rack. Preheat your oven to 350°F and wait for it to get to that temperature.
When the oven tells you it is 350°F, do not open the door. Instead, look at the oven thermometer reading through the window. If your oven has no window, open the door quickly to see the thermometer and close it right away to keep the heat inside.
If the oven thermometer shows a temperature within 10°F of 350°F, your oven is working well and needs no changes. But if the reading is very different from 350°F, follow the next steps to adjust your oven.
Step 2: Locate the Calibration Dial
Next, find the calibration dial or setting on your oven. If your oven has analog controls, look for a screw on the back of the temperature knob. Gently pull the knob straight off to see the calibration screw.
For ovens that have digital controls, check the settings menu for a calibration mode. You can find the instructions to access this menu in your oven’s owner’s manual. It will also show you how to adjust the calibration settings.
If you have trouble finding the calibration dial or the calibration mode, you can look in your oven’s manual. You can also contact the manufacturer’s customer support for help.
Step 3: Adjusting the Temperature Setting
For analog ovens, take a Phillips head screwdriver. Turn the calibration screw to the right to make the oven hotter. Turn it to the left to make it cooler. Only make small changes – about an eighth of a turn each time.
If your oven has digital controls, use the calibration mode. This lets you set the temperature change you want. For example, if your oven is usually 10°F too hot, you should set it to -10°F.
It’s important to make small changes and then test again. Even tiny changes to the calibration screw or settings can affect your oven temperature a lot.
Step 4: Re-testing for Accuracy
After you make the changes, you need to check the oven’s accuracy again. Preheat the oven to 350°F. Wait until it warms up to the set temperature. When the oven is done preheating, look at the oven thermometer like you did in Step 1.
If the thermometer shows the right temperature within 10°F, your oven is correctly set. You can start cooking confidently! If the temperature is still off, go back and repeat Steps 2 and 3. Make any more adjustments until you get the right accuracy.
Keep in mind that getting the proper temperature may take a few tries. Be patient, and remember that a perfectly calibrated oven is worth the work.
Calibrating Different Types of Ovens
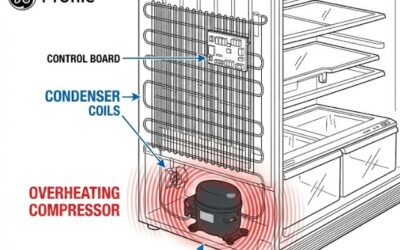
The basic ideas for calibration stay the same, but the steps can change based on your oven type. Different oven brands and models may each have their own ways to calibrate. Now, let’s look at how to calibrate two common ovens: GE Profile ovens with analog controls and those with digital controls.
Calibrating a GE Profile Oven with Analog Controls
To calibrate a GE Profile oven with manual controls, you will need an oven thermometer and a Phillips head screwdriver. First, set your oven to 350°F. As the oven is warming up, find the calibration screw. It is usually at the back of the temperature knob.
When the oven reaches 350°F, look at the oven thermometer. If the temperature is wrong, gently pull off the temperature knob to get to the calibration screw. Use the screwdriver to turn the screw. Turn it clockwise to make the temperature higher or counterclockwise to make it lower.
After each change, let the oven warm up again and check the thermometer once more. Keep doing this until the thermometer shows the right temperature of 350°F.
Calibrating a GE Profile Oven with Digital Controls
For GE Profile ovens with digital controls, calibrating the oven is usually easy. First, go to the oven’s settings menu. The way to do this can differ based on your model, so check your owner’s manual for help.
Once you reach the calibration mode, you can change the oven temperature in small steps, usually by 1 degree. If your oven gets too hot, lower the temperature a few degrees. If it is too cold, raise the temperature a bit.
After each change, preheat the oven and check the accuracy using an oven thermometer. Keep repeating this until the oven stays at the right temperature. Don’t forget to save your settings if the oven asks you to do so.
After Calibration: Ensuring Accuracy
Now that you have set up your oven correctly, it is important to keep it accurate over time. You should check it regularly and recalibrate when it is needed. This will help make sure you get tasty results in the kitchen. By adding these steps to your cooking routine, you will feel calm knowing your oven is a dependable tool. It will give the right temperatures for all your baking tasks.
How to Regularly Check Your Oven’s Temperature
Even if you set your oven carefully, its temperature can change over time. This can happen because you use it often, there are power changes, or parts may wear out. So, it’s smart to check your oven’s temperature now and then with an oven thermometer.
Pick a few common temperatures, like 325°F and 350°F. Use the same method as your first calibration test. Put the thermometer in the warmed oven, let it settle, and then compare the numbers.
If there is a big difference, your oven might need recalibration. By making regular temperature checks a part of your routine, you can solve any problems early. This way, your baking will turn out well.
When to Recalibrate Your Oven
Recalibrating your oven is not something you do often, but sometimes it is needed. If you have moved recently or face power changes in your area, you should recalibrate your oven. This helps make sure it gives the proper temperature.
Also, if your oven has been repaired or if you see problems with your baking results, it’s a sign that recalibration is needed. This is true even if you check the temperature often.
Keep in mind that it is important to check if your oven is accurate all the time. By paying attention to how your oven works and fixing any issues with recalibration, you can keep a reliable cooking partner for many years.
Conclusion
In conclusion, learning how to calibrate an oven temperature is very important. It helps to make sure your food cooks at the right heat and tastes great. You can follow the easy steps in this guide to adjust your oven correctly. Also, remember to check your oven’s temperature often. Recalibrate it when necessary to keep your baking and roasting on point. If you want more tips on cooking and taking care of your kitchen, visit our blog: How to Clean Glass Door on Monogram Ovens Without Streaks. Happy cooking!
Frequently Asked Questions
What if my oven doesn’t have a calibration dial?
If your oven does not have a calibration dial or mode, don’t worry. You can still get the right temperature. First, check the reading on your oven thermometer. Compare it with the temperature you want. When you bake, change the oven temperature to match the difference.
How do I know if my oven thermometer is accurate?
Test your thermometer by putting it in a pot of boiling water. It should show 212°F, which is the boiling point of water. If the number is wrong, you will need a new thermometer. This is important for making sure your oven temperature is accurate during calibration.
What should I do if calibration does not fix the temperature issue?
If calibration does not fix ongoing temperature issues, there may be a deeper problem with your oven. You might want to reach out to a qualified appliance repair technician. They can help find and fix the problem.